Waybill Tracking Getting Started Guide


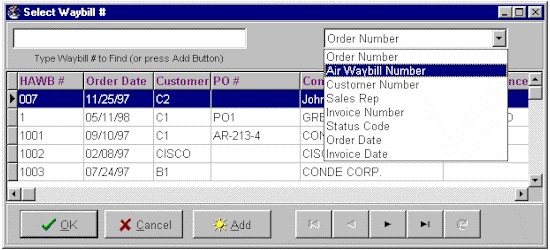
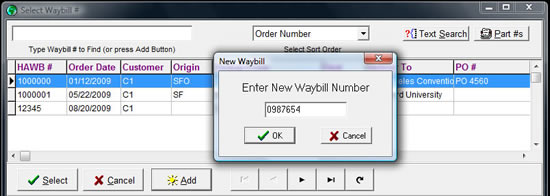
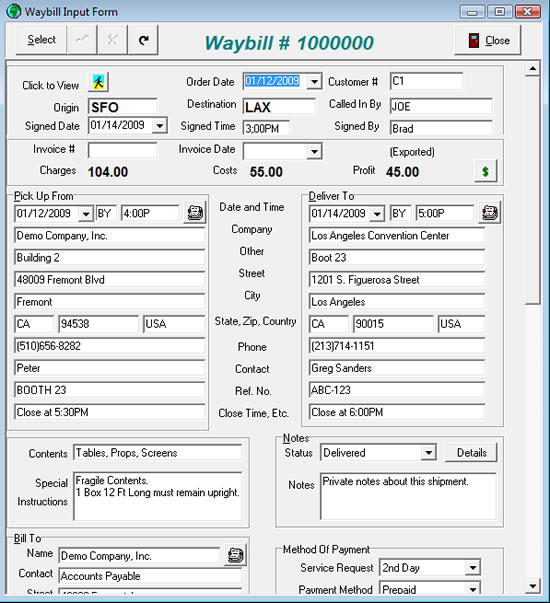
Thank you for using ARK System's Waybill Tracking program. Use this guide to get a quick overview of the program.

Navigator Toolbar

You will see this toolbar often in Waybill Tracking. It allows you to quickly navigate through records of the database. You can hover your mouse over each control


Enter Waybills

The "Select Waybill #" is the main screen you will use.

  • In the Search field, type in a waybill number to find.

  • If you want to sort the list, use the dropdown menu in the upper right corner, as shown here. (NOTE: not all columns are sortable)

  • To view more columns of data, drag the scroll bar to the right or expand your window

Once you find the correct waybill, select it, then click OK or press ENTER.

Add Waybills

To enter your own Waybill number, click Add, type a number, and then click OK.

On this screen you can:

  • Select a Customer from the list
  • Search for a customer based on its number, name or phone number.
  • Add a new Customer

Once you find or enter the correct customer, select it, then click Select or press ENTER.

Customer Type

Choose Pick Up or Delivery

  • If you will be picking up from this billing customer and delivering to another address, the customer’s address will display in the pick-up box.
  • Use the "Delivery" selection if you will be delivering the product to the billing parties’ location.

A new waybill will be created with all the information you provided.


Waybill Input Form

When hovering the mouse over some fields, notes will appear in the Status Bar at the bottom of the screen - guiding you on how to enter the appropriate data.

Dropdown lists, like the Pick Up From date field and the Notes' Status field, provide you with handy lookups to simplify data entry.


Customers

This section allows you to add customers or edit existing ones.

Edit Existing Customers

  • Select the customer you want to edit by using the Search field, or by sorting
  • Select the correct customer, then click OK

Add a New Customer

  • In the Search field, type in a customer number, and then click Add
  • Enter all Customer data on the next screen
If the Bill-To-Name is the same as the Customer’s pickup / delivery address, leave the word SAME in the name field.

Once you Tab past the Billing Name field, the Customer pickup information is populated onto the Billing information. (outlined in yellow)

Use the Web Password field (outlined in red) if you want the customer to access their POD data from the Internet. This requires the Weblink Module (purchased seperately).


The Tariffs Tab (outlined in yellow) allows you to set rates for an individual customer. These rates are used when rating a waybill in the input waybill section.


Special requests and Remarks pages allow you to track other information about this customer. There is also a special code line which is used for custom functions performed for certain customers. For instance, you can type "DEADBEAT" in this line and a flag will show up when entering a waybill for this customer.

Click Close when you are finished with all additions.


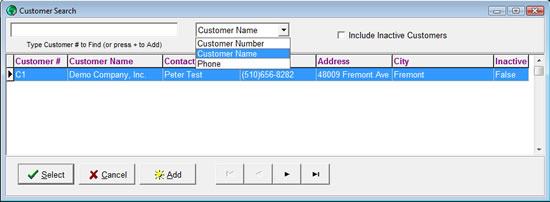
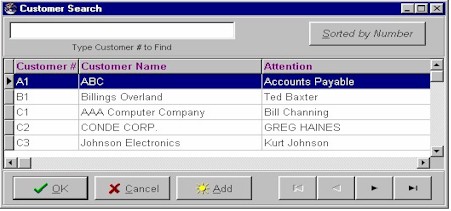
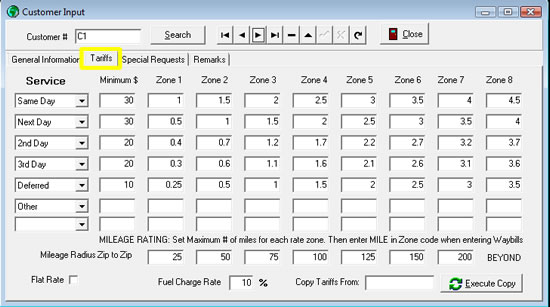
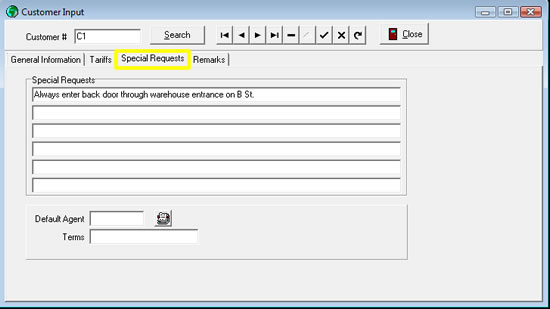
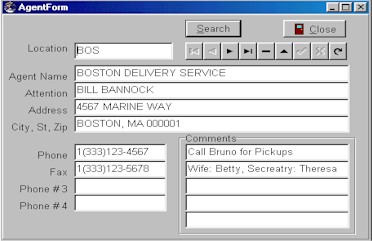
Agents

Agents can be either Delivery agents or Drivers. Input is very similar to customer input. You select the agent you want to edit on the Agent Search Dialog screen and click OK.

Add a New Agent

Since m ost users select an airport code for the Agent account number, enter that code and click Add. The Airport Code is not a requirement, but you are limited to a five-character location number.

Complete the agent information on the input screen. Click Close when finished.


Forms and Reports

Once you have entered a Waybill, you can create various forms and reports. The best way to learn these is just to try some and see which ones fit your business needs the best.

Logos and information on reports can be customized, if needed.

When printing a form or report, you can change printers by selecting the Printer Setup button. See our FAQs for detailed information on how to do that.


Helping With Any of Your Business Needs


Other support subjects: