this procedure manual includes operating instructions for ark system's waybill tracking system. it also includes information on day to day operations for air forwarding and trucking businesses using the program. with this program, you can print in-house waybills, airline waybills, alerts, invoices, and labels. the system will also give you various reports about orders taken, profits earned, clients serviced, etc.
the minimum computer configuration needed to run this program is an ibm compatible computer running windows (any flavor).
license and warranties
ark systems grants a license to you - the end user, the rights to use this program on a single computer at one time. the end user may make backup copies of the program for their own use and may use the software on one multi-user computer. the end user agrees not sell, distribute, rent, sublicense, or otherwise transfer the software or documentation without written authorization of ark systems. the end user agrees not to decompile, reverse engineer, or remove or alter any copyright notices contained in the software or documentation. because this program is inherently complex, ark systems makes no other warranties or representations, either express or implied with respect to this program or documentation. ark systems will not be liable for damages arising out of the use of the program or any code modifications made by end user or other end user employees.
this program is designed to be usable in both single user as well as network systems. simply download wbsetup.exe from www.waybilltracking.com. by default, the program is installed in c:\airbill. if you will be sharing the program, change this drive to your server or shared computer.
if the waybill program you are using says "evaluation copy" on the main screen, you are limited to entering five waybills and the program will expire in 30 days. to purchase the unrestricted full version and add your company name to reports and forms, please call ark systems at (650)328-1807. we will send you your unique serial number with your company name loaded in the program.
the program is normally started by double clicking on the waybill icon on your desktop screen. you should have an icon to access waybill for windows on your desktop. if you don’t, you can access it from my computer. find the folder airbill then double click airbillw.exe or click it once and press enter. keep in mind the waybill directory may be on a network drive. from the main menu, use the mouse, tab key, or enter key to navigate the program. to leave the program, click the exit button on main menu panel or select file, exit option on menu bar.
the following function keys are available in the program:
alt+f4 |
close the entire application |
|
ctrl+f4 |
close any single 'child' window open within the program |
|
f2 |
edit a selected field. |
|
f8 |
insert today’s date in the current field |
|
alt+{hotkey} |
selects the button or menu item with the underlined letter that matches {hotkey}. the terms hotkey, keyboard shortcut, and accelerator key are all synonymous. |
|
ctrl+x |
cut to clipboard |
|
ctrl+c |
copy to clipboard |
|
ctrl+v |
paste from clipboard |
|
enter |
selects ‘presses’ the default button (usually the one labeled ok). standard effect is to save any changes and close the open form. |
|
escape |
selects ‘presses’ the cancel button, if any. loses changes, normally, and/or closes the open form. |
you will see this toolbar often in this program. it allows you to quickly navigate through records of the database. the options are:
first record – beginning of the database.
previous record – move back one record.
next record – move forward one record.
last record – go to the end of the database
delete – delete the current record. you will be required to confirm your selection.
edit record – converts you to edit mode if not in view only mode.
post edit – saved the changes to disk. this also happens automatically when you exit or change records.
cancel edit – cancels your changes until you exit or change records.
refresh data – shows changes made by others on a multi-user system.
sometimes you will not see all these choices and at others you will also see a "+". this allows you to add data into the table.
most reports should be run monthly. it is best to save them for at least 3 years. that way, if need be, you could reconstruct information if it is changed or lost.
it is also important to backup your program and data files regularly. a full backup should be done at least weekly. be sure to have more than one backup set in case one is over-written with corrupt data. should you ever have a problem with your files, remember - this is not the time to backup!! you will have to find your most recent backup and be ready to restore it.
remember to always exit the waybill program before turning off or rebooting your computer. this is especially critical if you are in a submenu item (like inputting orders). closing the system down while editing data could cause corruption. should there be a power failure or network problem while doing this, index the files once you are back up and check the last order you were working on. most likely, everything is still there except the changes you were just entering.
the next section of this manual deals with various menu choices in the waybill program. there are four buttons on the main menu panel: waybills, customers, agents, and exit. all this buttons can also be accessed from the menu bar. each section will be discussed in the order they appear below:
use this selection to change your currently selected printer. by default, every time you load the waybill for windows program it will select your default windows printer. all reports will go to the printer selected here until you exit the program.
select this option to exit from waybill for windows. the same result can be achieved by clicking the exit button on the main menu panel or the x on the upper right hand corner. all work will be saved when you exit.
this will be the main selection you will use. when you select this option, it will give you the select waybill dialog, as follows:
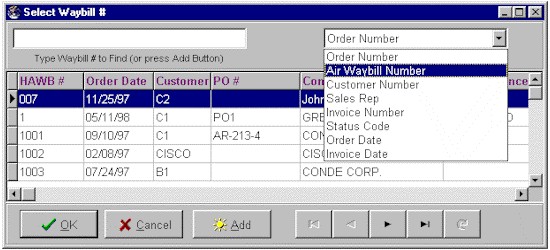
type in the waybill number to search on the top left input field. if you want to search by another sort order, you can change the order by clicking the down arrow on the top right field. this will give you a dropdown list of available indexes. then as you can type in information matching the sort order to find the needed waybill. to view more fields, move the bottom scroll bar to the right. once you find the correct waybill, click the ok button or press enter.
to add a new waybill number, type in the new waybill number on the top left field and click add button. it then will give you the select customer dialog screen. select the customer for this new waybill. you could search the customer based on its number or name. (for more detail explanation on customer see customer input section.). you can also add a new customer at this point.
next, the screen will ask you if this is a pickup or delivery customer. if you will be picking up from this billing customer and delivering to another address, this will put the customer’s address in the pick-up box. use delivery address if you will be delivery product to the billing parties’ location. now it will create a new waybill with all the information provided based on your selections. the waybill input form will look like this:
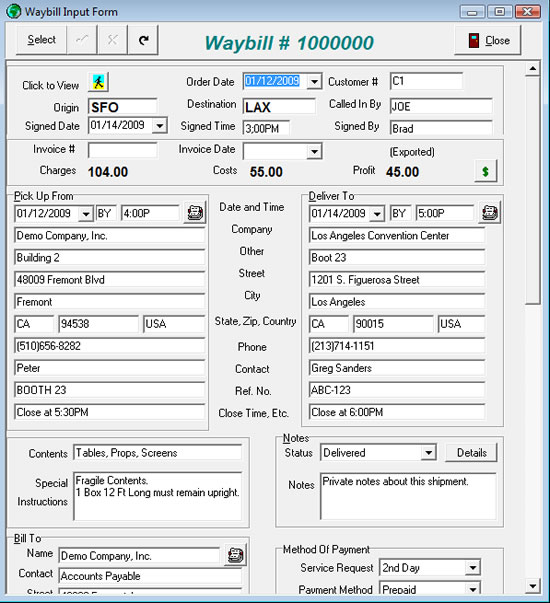
many input fields have help bubbles that show up when the mouse is left over the data field. also any field that has a down arrow has a lookup section available. click on these or press alt plus the down arrow key to active them.
choose this selection if you want to add or edit the customer data. first, you will have to select the customer you want to edit. the following screen gives you the option to search and select the customer. type the customer number on the top left field and it will bring you to the closest match to the existing customer. you can also change the sort to customer name by clicking the button on the top right window. click ok button when you have chosen the customer.
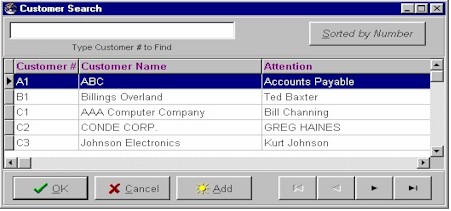
to add a new customer, type in the new customer number on the top left field and click the add button. complete all the information for this customer.
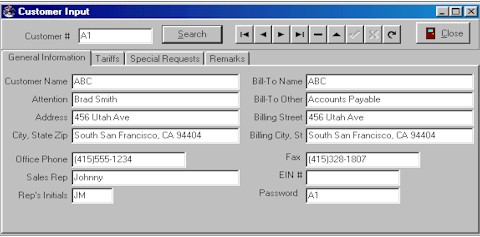
if the bill-to-name is the same as the customer’s pickup / delivery address, leave the word same in the name field. then once you tab past this field, it will change to the customer pickup information. use the password field to assign a password to this customer if you want them to access their pod data on the internet. this requires the weblink module (purchased seperately).
the tariff page allows you to set rates for an individual customer. these rates are used when rating a waybill in the input waybill section. special requests and remarks pages allow you to track other information about this customer. there is also a special code line which is used for custom functions performed for certain customers. for instance, you can type "deadbeat" in this line and a flag will show up when entering a waybill for this customer. click the close button when done.
agents input is very similar to customer input. you select the agent you want to edit on the agent search dialog screen and click the ok button, or to add a new agent, enter their airport code and click the add button. most users select an airport code for the agent account number, though this is not necessary. you are limited to a 5 character location number though.
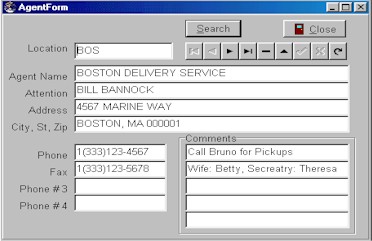
complete the agent information on the input screen. click close button when done.
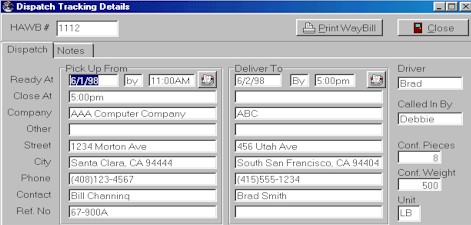
select this option if you dispatch trucks. this utility will keep track of the status of the waybill even if you do not know the final waybill number yet. you could assign a temporary waybill number and change it later with the real waybill number once the package has arrived with the correct bill of lading information. when the package has been delivered, you remove it from the dispatch list. it then becomes a regular waybill ready for invoicing, etc.
this section is for printable forms from the data entered in the previous sections.
this will print the actual house air waybills. you must specify the waybill order number to print. if you leave the waybill field empty, it will pop the select waybill dialog. be careful that the pre-printed numbers match the numbers given in the input waybill section.
use this option to print an airline's waybill. choose the airline from a pick list, if you have not done so. please note: these waybills must be printed on a heavy duty dot matrix or a typewriter with a computer interface since several copies must be imprinted.
once an order has been filled, and all prices have been entered and checked, an invoice is printed. the option will be vary depend on the type of invoice you use. there are multi invoicing and single invoicing form. these can be printed on a pre-printed invoice form or blank paper. once the invoice has been printed, the waybill database will be updated with the invoice date and invoice number. this marks the waybill as completed and ready for exporting to accounting. if you are not actually ready to export this waybill, delete the invoice date and invoice number data.
if a mistake is made, you can reprint invoices and re-update the files as needed. remember though, that if you change an amount and re-invoice after you have exported invoices to the accounting, you will need to also create a credit (or debit) memo in your accounting system.
this form is used to alert the pickup or delivery agent of merchandise they should be expecting. you can choose either consolidated or single waybill format.
should you need to prepare label for shipping purposes, this utility does it for you. for laser forms, use an avery or compatible label form with 6 - 3 1/2" x 4"labels. the avery part number is 5164. dot matrix labels print on 3 1/2" x 4 1/2" continuous forms. other customized shipping label can also be created. do not forget to change your printer before printing to dot matrix and restore it when done, otherwise you may print to the wrong printer.
should you need to prepare customer or agent labels, this utility will print these on 1" x 3 1/2" labels. by default, it will print customer or agent from the beginning to the end.
use this form when you need to provide u.s. department of commerce for international shipping.
this is an optional module that can be used if you are not exporting waybill information to another accounting package. it is turned on and off in the utility, setup section. while this is a very useful module to keep track your account receivable, it was not intended to replace your accounting package. this module will handle cash receipts and provide you with an up to date information on customer balances, as well as a cash journal report.
use this menu item when you receive a payment from your customer. select the customer number, type in the check number and the amount received. it will give you the list of unpaid invoices. then you choose the invoice you want to pay.
you can keep entering cash receipts for your customer on one batch. when done, it will prepare a deposit slip for you.
should you have a mistake while entering cash receipts, you can use this menu item to correct or delete it.
when you have a valid claim from your customer and need to give a credit on an invoice, select this menu item. enter the invoice number and the amount to credit. the system will then prepare a credit memo for you.
choose this menu item when you need to undo an invoice. it will put the waybill back to order entry status.
this report provides a cash receipts journal based on the date range you provided.
this report prepares a standard aging report by customer and delinquent days.
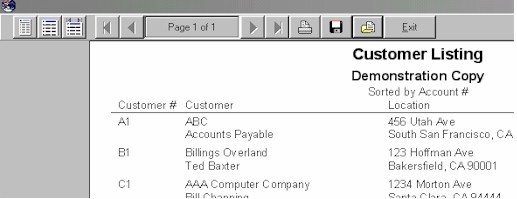
most reports are viewable on screen before printing. they are presented in a dialog box that allows various functions to be performed. the 3 buttons on the left allow you to resize the report in the screen. the arrow keys allow scrolling through the report. the printer icon allows printing of the report to the default printer. also, a report can be saved and retrieved using the disk and folder icons.
customer listing
this report will list customer names, account numbers, address information, etc. in a tabular format to the screen or printer. it can be sorted by customer number or customer name.
this report will list all house air waybills (orders) that do not have the signature field filled in. use it to audit which orders have not been completed and are still in progress. this report can be used to tell which orders need more work before invoices can be prepared.
use this report to audit the orders for completeness. when all information is entered, you should be able to determine costs, billings, and profitability for a given period. this report is usually run monthly.
this is a list of orders by customer for a given time period. you should run this at least monthly to cross check waybill information to accounting accounts receivable data.
this report is very similar to list customers, except that it lists pickup, delivery agents instead.
use this report to see commissions paid to various parties. these will be sorted by the ccn/rep code used when inputting orders. they will be subtotaled by ccn for a specific date range.
use this report to list declared value for each waybill.
use this report to provide your customer a proof of delivery of their shipment.
this is another version of declared value report with miscellaneous charges that apply to it.
access this selection if you have any customize report that we design especially for you.
this program allows you to change a waybill number. error checking is performed to make sure that all related files are also converted. this method is preferred rather than changing waybill numbers in the waybill audit screen. typically, you would use this function when you need to reprint a waybill on a new pre-numbered form or you took an order that did not yet include the pre-printed waybill.
use this utility to audit your waybill data and make some changes when necessary. the data is presented in spreadsheet format. you can also search the table and change the sort order to find waybill quickly. to edit a field, press the f5 key or click on the field. multiple clicks will allow you to edit a specific part of the field rather than the whole thing.
the status field reflects the numeric status codes for order entry, invoiced, etc. see the utility setup section for a listing of these codes. the exported field is automatically marked true once a waybill is exported to your accounting software. if you are using the build-in accounting module, this will stay false. invoice number and invoice date fields are also automatically filled in once a waybill is invoiced. if you need to re-invoice an waybill, simply delete the invoice number and invoice date. the waybill then be marked as un-invoiced.
when you exit this screen, you will be asked if you want to recalculate the totals. answer yes if you changed rates or costs. this recalculated the total charges as well as gross profit fields.
this utility transfers the waybill data to quickbooks or champion accounting. included is a report giving the invoices to be exported as well as the dos export utility itself. these functions will give you the opportunity to backup, review, and total the invoices to be exported before the data is transferred. once the invoices are exported a flag is set that marks them as exported. this flag can be viewed or modified in the waybill audit screen.
be careful when reviewing this data. once invoices have been exported, to correct them, you will need to create credit or debit memos in the accounting program as well as correct them in the waybill program. when exporting to champion accounting, the system will check that duplicates are not created. this is not possible in the quickbooks export. if you discover duplicates in a quickbooks import batch, you will need to restore the quickbooks backup and re-import the correct invoice batch.
use this utility to upload your data to your website. it allows your customer to see the status of their shipment using any internet browser while keeping your main data sheltered from hackers. we rely on sending a block of customer data to an internet service provider rather than having customers dial in to your site.
to give a customer the ability to access your data, give them a password in the customer input screen. this will upload their waybill data as well as password the next time you update your web site.
typically, you will create an export file for all customers with waybills less than one or two months old. this data is parsed when the customer dials in and creates their proof of delivery printout.
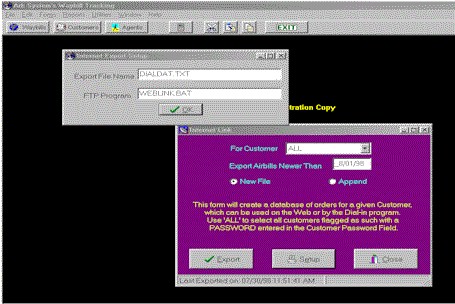
use the setup button to configure the export file and file transfer protocol (ftp) program. these should normally be set to dialdat.txt and weblink.bat. weblink.bat and weblink.dat can be modified with a text editor to configure your internet service provider's settings.
when you click export, the program gathers the requested waybill data (not confidential information) and creates the export file. then the dos ftp program is called to connect to the internet and transfer the data files dialdat.txt (data file) and dialdat2.txt (password file).
you should only need to use this if there is a problem with the system. if a computer is turned off accidentally or there is a power outage, index files often are corrupted. this utility will also free up space if you have deleted several orders or customers. if the program is behaving suspiciously, it is best to run this utility first. be sure no one is entering data when you run this utility! if they are, it will not corrupt data, but the file will not be indexed.
company address, telephone number, and start up data is stored in this section. if there is a change of address or telephone, enter it here. you cannot change the company name without consulting ark systems. if you do, the program will revert back to demo mode. other default rates are set here. these are used for computations in input waybill section. if you enter a supervisor password, you will be required to enter it before entering certain utility and profit / loss reports. keep this password in a safe place!
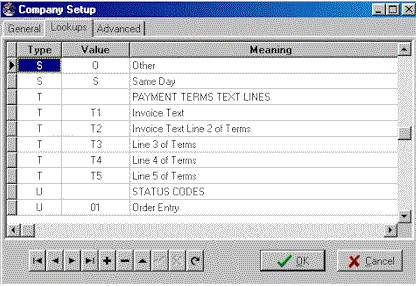
the lookups tab is used to set lookup table codes. a code with no value is a category definition filed only. it is not used in the lookup tables. the categories are: type a: airport codes. use for airports you actively service. (not currently used.) type m: method of payments. payment methods available when entering a waybill for a given customer. type s: service request options. types of service you offer: same day, next day, etc. type t: invoice text. these lines show up at the bottom of all invoices you print. you can add as many lines as you need. type u: status codes. where the package is at this time. this information shows up on your web site and can be used for internal package tracking. be sure there is always a category called "invoiced". this is automatically used once you invoice a waybill.
before you change any of the advanced settings, please contact ark systems.
use this option to view open input screens one next to the another.
use this option to view open input screens stacked one over another.
this will close all open input screens.
use this option to view this procedure manual on line. it can be printed using the "file", "print" option of your web browser.
this screen tells about the version number and information about your system.
